The Kenmore Mini Ultra Sewing Machine is a compact, versatile sewing solution designed for beginners and hobbyists. It offers ease of use, portability, and essential features.
1.1 Overview of the Kenmore Mini Ultra Sewing Machine
The Kenmore Mini Ultra Sewing Machine is a portable, user-friendly sewing machine designed for hobbyists and beginners. Its compact size makes it ideal for small sewing projects.
Featuring a lightweight design, it is easy to transport and store. The machine is equipped with essential stitching options, automatic threading, and an LED light for better visibility. Perfect for repairing clothes, crafting, or quilting, it offers a great balance of simplicity and functionality, making it a versatile tool for creative sewing projects. Its intuitive controls and durable construction ensure a smooth sewing experience, catering to both casual and dedicated sewers alike. This machine is a practical choice for anyone looking to explore the world of sewing without the complexity of larger models.
1.2 Key Features and Benefits
The Kenmore Mini Ultra Sewing Machine is equipped with a range of features designed to enhance your sewing experience. It includes 12 preset stitch options, automatic threading, and an LED light for better visibility. The machine is lightweight and portable, making it ideal for small projects and on-the-go use. Its compact design allows for easy storage, while the adjustable stitch length and width provide flexibility for various fabrics. Additional features like a built-in needle threader and a free-arm design simplify tasks like sewing cuffs and sleeves. These features make it a versatile tool for both beginners and experienced sewists, offering convenience, efficiency, and creativity in every stitch.
1.3 Safety Precautions and Warnings
Always prioritize safety when using the Kenmore Mini Ultra Sewing Machine. Keep loose clothing and long hair tied back to avoid entanglement. Ensure children are supervised and do not touch moving parts. Use the machine on a stable, flat surface away from water. Avoid sewing over fingers or pinch points. Never insert sharp objects into the machine. Use the correct needle size to prevent breakage. Keep the work area well-lit to maintain clear visibility. Disconnect the power cord before cleaning or maintaining the machine. Follow all manufacturer guidelines to ensure safe operation and prevent accidents. Regularly inspect the machine for damage or wear. Store the machine out of reach of children when not in use.
Unboxing and Initial Setup
Unboxing reveals the machine, power cord, and accessories. Initial setup involves assembling parts, threading, and ensuring proper function for a seamless sewing experience.
2.1 What’s Included in the Box
Inside the box, you’ll find the Kenmore Mini Ultra Sewing Machine, a power cord, and a foot controller. Additional accessories include a set of bobbins, sewing needles, and a small collection of presser feet for basic sewing tasks. A user manual is provided for guidance, along with a quick-start guide to help you get sewing quickly. The package also includes a limited warranty information booklet and a list of customer support contacts. Ensure all items are accounted for before discarding the packaging. These components are designed to provide everything you need to start sewing right away, making the unboxing experience straightforward and hassle-free.
2.2 Understanding the Machine Parts and Accessories
Familiarizing yourself with the Kenmore Mini Ultra Sewing Machine’s components is essential for smooth operation. The machine features a compact design with a clear plastic cover for visibility. Key parts include the spool pins, bobbin winding mechanism, stitch selector dial, and presser foot lever. Accessories like the power cord, foot pedal, and seam ripper are also included. The sewing machine comes with interchangeable presser feet, such as the zigzag and straight stitch feet, to accommodate various fabrics and projects. Understanding each part’s function ensures proper setup and use, while the accessories enhance versatility and convenience for different sewing tasks.
2.3 Setting Up the Machine for First Use
Before first use, ensure the machine is placed on a stable, flat surface. Plug in the power cord and familiarize yourself with the control panel. Remove any protective packaging materials and inspect for damage. Wipe the machine with a soft cloth to remove dust. Thread the machine as per the threading guide, ensuring the spool is correctly seated. Insert the bobbin into the bobbin case and gently pull the thread to set the tension. Test the machine by sewing a straight line on scrap fabric to ensure proper function. Refer to the threading guide for detailed steps. Always keep the area clear of debris and children while setting up.
Operating the Kenmore Mini Ultra Sewing Machine
Operating the Kenmore Mini Ultra Sewing Machine is straightforward, with intuitive controls for basic stitching, reverse sewing, and stitch selection, ideal for various sewing projects.
3.1 Threading the Machine: Step-by-Step Guide
To thread the Kenmore Mini Ultra Sewing Machine, start by placing the thread spool on the spool pin. Gently pull the thread through the first guide, located at the top of the machine. Next, loop the thread around the tension disc, ensuring it clicks into place. Continue by guiding the thread through the take-up lever and then through the second guide near the needle. Finally, insert the thread through the needle’s eye from front to back. Leave about 6 inches of thread hanging. Pull the thread gently to ensure it is properly seated. Always refer to the manual for specific guidance to avoid threading errors.
3.2 Winding and Inserting the Bobbin
To wind the bobbin, place it on the spindle and thread the end through the bobbin’s hole. Wind slowly, keeping the thread taut. Once full, cut the thread. Insert the bobbin into the bobbin case, ensuring it clicks into place. Pull the thread gently to set tension. Make sure the bobbin is seated correctly and the thread is not tangled. Close the bobbin case securely. Always use the same thread type for top and bobbin threads. Properly winding and inserting the bobbin ensures even stitches and prevents machine jams. Follow these steps carefully for smooth operation.
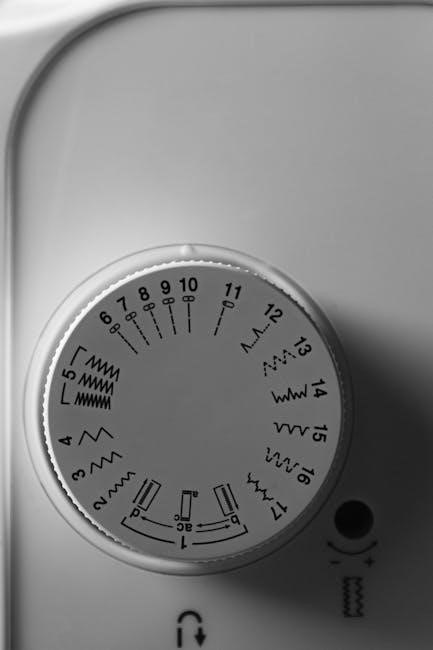
3.3 Selecting the Right Stitch for Your Project
Selecting the right stitch is crucial for achieving professional results with your Kenmore Mini Ultra Sewing Machine. The machine offers a variety of built-in stitches, including straight, zigzag, and decorative options. For general sewing, the straight stitch is ideal for lightweight fabrics like cotton or linen. The zigzag stitch is perfect for stretchy fabrics or preventing fraying. Decorative stitches add a creative touch to projects like embroidery or quilting. Always consider the fabric type, project requirements, and desired finish when choosing a stitch. Use the stitch selection dial or buttons to navigate through options, and refer to the stitch chart on the machine or in the manual for guidance. Testing stitches on scrap fabric can help ensure the best results.
3.4 Sewing Basics: Forward and Reverse Stitching
Mastering forward and reverse stitching is essential for sewing. Forward stitching moves fabric in one direction, creating straight lines. Reverse stitching reinforces seams by sewing backward.
To use reverse stitch, locate the reverse stitch lever, typically near the machine’s base. Pull it down to activate. Sew a few reverse stitches at the start and end of seams.
This prevents unraveling. Always test stitches on scrap fabric to ensure proper tension and alignment. Practice these basics to achieve professional-looking results.

Advanced Sewing Techniques
The Kenmore Mini Ultra Sewing Machine supports advanced techniques such as multi-layer stitching, customizable tension settings, and interchangeable presser feet for specialized tasks, enhancing creativity and precision.
4.1 Working with Different Fabric Types
The Kenmore Mini Ultra Sewing Machine is versatile and can handle various fabric types, from lightweight cotton to heavier materials like denim. For delicate fabrics, use a sharp needle and a shorter stitch length to prevent tearing. When sewing thick fabrics, such as canvas or fleece, switch to a heavy-duty needle and increase the stitch length for better penetration. Knits and stretchy fabrics require a zigzag stitch or a stretch needle to maintain elasticity. Always test your fabric with a scrap piece to ensure the settings are appropriate. Using the right presser foot, like the zigzag foot for knits, can improve results. Adjusting tension and thread type may also be necessary for optimal performance across different materials.
4.2 Adjusting Tension for Perfect Stitches
Proper tension adjustment is crucial for achieving consistent and even stitches on the Kenmore Mini Ultra Sewing Machine. Start by locating the tension dials, typically found on the front or top of the machine. Turn the dials slightly clockwise to increase tension or counterclockwise to decrease it. Always test adjustments on scrap fabric before sewing your final project. For balanced stitches, ensure both the upper and lower thread tensions are evenly set. If stitches are too loose or tight, make small incremental changes and retest. Different fabrics may require varying tension levels, so adjust accordingly for materials like cotton, denim, or silk. Refer to the user manual for specific guidelines and diagrams to achieve optimal stitch quality.
4.3 Using the Built-In Sewing Patterns
The Kenmore Mini Ultra Sewing Machine comes with a variety of built-in sewing patterns, allowing you to explore different stitching options for various fabrics and projects. To use these patterns, simply rotate the pattern selection dial to choose your desired stitch. The machine features a clear LCD display that shows the selected pattern, making it easy to navigate. For decorative stitching, some patterns include floral, zigzag, and straight stitch variations. Always test the stitch on scrap fabric before sewing your final project to ensure the tension and length are set correctly. This feature is perfect for adding a personal touch to garments, home decor, or crafts, giving your creations a professional finish.
4.4 Sewing Buttons and Other Attachments
Sewing buttons and attachments is made easy with the Kenmore Mini Ultra Sewing Machine. Start by positioning the button on your fabric, ensuring it’s centered and secure. Use a zigzag stitch or the buttonhole setting to sew around the button, reinforcing it with a few back-and-forth stitches. For heavier buttons, consider using a denim needle and a stabilizing material like interfacing underneath. Attachments like snaps or hooks can be sewn similarly, using a straight stitch for alignment and a zigzag for durability. Always test on scrap fabric first to ensure proper tension and alignment. This feature makes the machine ideal for DIY repairs and customizing clothing or accessories.
Maintenance and Troubleshooting
Regularly clean and lubricate the machine to ensure smooth operation. Check for loose threads and dust buildup. Refer to the manual for troubleshooting common issues like uneven stitching or jams.
5.1 Cleaning and Lubricating the Machine
Regular cleaning and lubrication are essential to maintain the performance and longevity of the Kenmore Mini Ultra Sewing Machine. Turn off and unplug the machine before starting. Use a soft brush to remove lint, thread scraps, and debris from the bobbin area, tension discs, and stitch plate. For stubborn lint, a small vacuum cleaner or compressed air can be used. Apply a few drops of high-quality sewing machine oil to the machine’s moving parts, such as the shuttle hook and gears, as indicated in the manual. Avoid using household oils, as they can damage the machine. Proper lubrication ensures smooth operation and prevents friction-related issues. Always refer to the manual for specific cleaning and lubrication points to keep your machine in optimal condition.
5.2 Common Issues and How to Fix Them
Like any sewing machine, the Kenmore Mini Ultra may encounter issues. Common problems include thread jams, uneven stitches, or bobbin issues. To fix thread jams, gently remove the bobbin and rethread the machine; For uneven stitches, check thread tension and ensure the bobbin is properly seated. If the machine is noisy or vibrating excessively, ensure it is placed on a stable surface. Regular cleaning and lubrication can prevent many issues. Always refer to the user manual for specific troubleshooting steps. If problems persist, contact Kenmore customer support or visit an authorized service center for professional assistance. Proper maintenance and care will extend the machine’s lifespan and performance.
5.3 Understanding Error Codes and Solutions
The Kenmore Mini Ultra Sewing Machine may display error codes to indicate specific issues. These codes help users identify and resolve problems quickly. Common errors include thread jams, bobbin issues, or mechanical malfunctions. For example, an “E1” error often signals a threading problem, while “E2” may indicate improper bobbin installation. Refer to the user manual for a full list of codes and solutions. Always turn off and unplug the machine before attempting repairs. If issues persist, contact Kenmore customer support or visit an authorized service center for professional assistance. Regular maintenance, like cleaning and proper threading, can prevent many errors and ensure smooth operation.
5.4 Storing the Machine Properly
To maintain the Kenmore Mini Ultra Sewing Machine’s performance and longevity, proper storage is essential. Always unplug the machine and clean it thoroughly before storing. Use the original packaging or a sturdy, dry container to protect it from dust and moisture. Store in a cool, dry place away from direct sunlight and extreme temperatures. Avoid stacking heavy objects on top of the machine. Cover it with a soft cloth or protective cover to prevent scratches. Ensure all accessories are securely stored in a separate compartment to avoid misplacement. Before storing for extended periods, wind the bobbin and thread the machine loosely to prevent tension issues. Regularly inspect the machine for dust or debris when retrieving it for use.
Accessories and Optional Attachments
The Kenmore Mini Ultra Sewing Machine offers various accessories like specialized presser feet, extension tables, and additional bobbins to enhance your sewing experience and project versatility easily.
6.1 Compatible Presser Feet for Various Tasks
The Kenmore Mini Ultra Sewing Machine supports a variety of presser feet, each designed for specific sewing tasks. The standard presser foot is ideal for general sewing, while the zigzag foot allows for decorative stitching. A zipper foot is perfect for installing zippers and sewing close to edges, and the blind hem foot is great for invisible hems. Additional presser feet, such as the buttonhole foot and the walking foot, can be purchased separately to expand your sewing capabilities. Always refer to the user manual for compatibility and installation instructions. Using the right presser foot ensures precise control and professional results for any project.
6.2 Using the Sewing Table or Extension Table
The sewing table or extension table provides a spacious work area, enhancing stability and control while sewing large or complex projects. Attach it securely to the machine to prevent wobbling. Ensure the table is level and firmly connected. For heavy fabrics or quilting, the extension table offers additional support, reducing fabric drag. Adjust the table height to your comfort for ergonomic sewing. Store the table properly when not in use to maintain its condition. Refer to the manual for specific attachment instructions and compatibility details. This accessory is ideal for managing bulky materials and streamlining your sewing process.
6.3 Additional Accessories for Enhanced Sewing
To enhance your sewing experience, consider exploring additional accessories designed for the Kenmore Mini Ultra Sewing Machine. These include specialized presser feet, such as a walking foot for heavy fabrics or a quilting foot for precise stitching. An extension table can provide extra workspace, making it easier to manage larger projects. Optional attachments like embroidery hoops or custom stitch plates can expand your creative possibilities. Accessories like a carrying case, extra bobbins, and a seam ripper add convenience. These tools not only improve efficiency but also allow you to tackle a wider range of sewing tasks with confidence and precision, helping you achieve professional-quality results and explore more complex projects.
Tips for Getting the Most Out of Your Machine
Maximize your Kenmore Mini Ultra Sewing Machine’s potential with regular maintenance, proper fabric selection, and exploring its stitch options for diverse projects.
- Keep the machine clean and well-lubricated for smooth operation.
- Experiment with different fabrics to discover its versatility.
- Utilize built-in stitches for creative and professional finishes.
7.1 Optimizing Your Sewing Workflow
To optimize your sewing workflow with the Kenmore Mini Ultra Sewing Machine, start by organizing your workspace. Keep fabrics, threads, and accessories within easy reach to minimize interruptions. Use a sewing table or extension table for better support and efficiency. Pre-cut fabrics and prepare patterns in advance to save time during sewing sessions. Familiarize yourself with the machine’s stitch options and select the appropriate one for your project beforehand. Regularly clean and maintain the machine to ensure smooth operation. Consider creating a checklist for setup and teardown to streamline your process. By implementing these strategies, you can enhance productivity and enjoy a more seamless sewing experience.
7.2 Customizing Your Sewing Experience
Customizing your sewing experience with the Kenmore Mini Ultra Sewing Machine allows you to tailor settings to your preferences. Adjust stitch length, width, and tension to suit your fabric type and project needs. Explore the built-in stitch patterns and save your favorites for quick access. Personalize buttonhole sizes and shapes to match your designs. Utilize the machine’s adjustable sewing speed to maintain control, especially when working with delicate materials. Experiment with different presser feet to enhance functionality for specific tasks, such as zigzag or blind hemming. By fine-tuning these settings, you can create a seamless and enjoyable sewing process that aligns with your creative vision and skill level.
7.3 Exploring Creative Sewing Projects
Unleash your creativity with the Kenmore Mini Ultra Sewing Machine by exploring a variety of fun and practical sewing projects. Start with simple tasks like stitching custom tote bags, crafting decorative pillow covers, or creating personalized accessories such as hairbands and belts. For more advanced users, try making small stuffed animals, embroidered patches, or even upcycling old clothing into unique designs. The machine’s portability and ease of use make it ideal for experimenting with different fabrics and patterns. Don’t hesitate to explore DIY tutorials online for inspiration, and remember to always follow safety guidelines while working on your projects. Let your imagination run wild and enjoy the satisfaction of creating something truly personalized!
Warranty and Customer Support
The Kenmore Mini Ultra Sewing Machine comes with a limited one-year warranty covering manufacturing defects. For support, visit Kenmore’s official website or contact their customer service team.
8.1 Understanding Your Warranty Coverage
Your Kenmore Mini Ultra Sewing Machine comes with a limited warranty designed to protect your investment. The warranty typically covers defects in materials and workmanship for a specified period, usually one year from the date of purchase. During this time, Kenmore will repair or replace defective parts at no additional cost. Certain components, such as the motor or electronic controls, may have extended coverage. To activate your warranty, ensure you register your product on Kenmore’s official website. Keep your purchase receipt and warranty document safe, as they are required for any warranty claims. Note that the warranty does not cover damage caused by misuse, improper maintenance, or normal wear and tear. For detailed terms and conditions, refer to the warranty agreement provided with your machine.
8.2 Contacting Kenmore Customer Service
To contact Kenmore customer service, visit their official website and navigate to the support section. You can reach them via phone, email, or live chat for assistance with your Mini Ultra Sewing Machine. Representatives are available to help with troubleshooting, repair inquiries, or general questions. Ensure you have your product serial number and details ready for efficient support. For urgent issues, calling is recommended, while email is suitable for non-urgent inquiries. Live chat offers quick responses during business hours. Additionally, the Kenmore website provides a comprehensive FAQ section and user manuals for self-help. Contacting customer service is the best way to resolve any concerns and ensure optimal use of your sewing machine.
8.3 Finding Authorized Service Centers
To ensure your Kenmore Mini Ultra Sewing Machine receives proper care, locate authorized service centers through the official Kenmore website or customer support.
Visit the Kenmore website and navigate to the “Support” or “Service Centers” section. Enter your location to find nearby centers. Additionally, contact Kenmore customer service directly for assistance.
Authorized centers are certified to handle repairs and maintenance, ensuring genuine parts and warranty compliance. Avoid unauthorized services to maintain your machine’s performance and validity of its warranty.
Some retailers where you purchased the machine may also provide referrals to authorized centers. Always verify certification before scheduling service to ensure quality and reliability.
The Kenmore Mini Ultra Sewing Machine is a practical, user-friendly tool for crafting and repairs. Its compact design and essential features make it ideal for beginners and hobbyists alike.
9.1 Summary of Key Features and Benefits
The Kenmore Mini Ultra Sewing Machine is a portable, user-friendly device designed for sewing enthusiasts. It features multiple built-in stitches, automatic threading, and an LED light for visibility. The machine is lightweight, making it easy to transport, and comes with essential accessories like presser feet and bobbins. Its compact design allows for efficient use in small spaces, while the intuitive controls simplify the sewing process. The machine is ideal for basic repairs, crafting, and DIY projects. With its durable construction and easy maintenance, it offers long-term reliability. Whether you’re a beginner or an experienced sewer, the Kenmore Mini Ultra Sewing Machine provides a versatile and practical solution for your sewing needs.
9.2 Encouragement for Further Exploration
Embrace the creative possibilities of the Kenmore Mini Ultra Sewing Machine by exploring advanced techniques and projects. Experiment with various fabrics, stitches, and patterns to enhance your sewing skills. Discover how to customize garments, create home decor items, or craft unique gifts. The machine’s versatility allows you to tackle complex tasks with confidence. Join sewing communities or online forums to share ideas and learn from others. Continuous exploration will unlock new ways to utilize your machine, ensuring it remains a valuable tool for years to come. Keep experimenting and pushing your creative boundaries to make the most of your sewing journey.